Search This Blog

Tuesday, October 29, 2013

meringue in another year!!

Today is a very celebratory day!! Exactly one year ago, I decided to start up this blog and post my very first recipe. It was the first of many days off from school due to Superstorm Sandy (also a year ago today), and before my power went out, I had been spending my time in the kitchen.. and blogging! Since that first post I have learned so much about baking, cooking, and healthy eating and because of this blog I have tried so many new recipes.

Sixty blog posts, sixty puns, and sixty different recipes later, my blog has had thousands of views and hopefully a lot of beneficial ideas and tips spread to all the readers! I certainly have learned a lot through my experiences as a blogger during this past year, and I anticipate another great year to come!

So thank you to everyone that's been reading my blog and following all of my newest posts!! (And if you want to keep up with what's new, sign up to get emails for each new post - type the email address in the box to the right below the "About Me").

In celebration of this one year anniversary, I made chocolate meringue cookies tonight. As far as nutrition goes, they aren't on the top of the list, but they're pretty much down to the core, only made of a few ingredients. They're also very light and airy, so eating one (or two) won't make you feel full and bloated. They're the perfect size (if you make them relatively small) to pop into your mouth, and they don't taste too sweet or too bland. To me, these cookies feel like edible clouds.

As you can see they all look different.. I tried experimenting with fancy swirls for a while!

Here's what you'll need:
yields 6 dozen small cookies
3 large egg whites
1/4 tsp salt
1/4 tsp cream of tartar
1 cup sugar
3 tbsp unsweetened cocoa

1. Preheat the oven to 300 degrees. In a large mixing bowl, whisk egg whites, salt and cream of tartar until soft peaks form (still fairly liquid but can hold a "peak").


2. Add sugar, 1 tablespoon at a time. Using an electric mixer, beat until stiff peaks form. The mixture will become glossy and sticky. If you were to flip the bowl upside down, nothing would move or pour out. **This does take a while (about 15 minutes) so don't lose hope or get discouraged!!
**What you'll notice is that the very small amount of egg that you begin with will seem to grow as you add in the sugar. This is due to the sugar (which would make sense, wouldn't it?) but also all of the air that's incorporated.


3. Sift cocoa over egg white mixture and fold in (so as not to remove all the air that you just mixed into the mixture).


4. Cover a cookie sheet with parhment paper. Fill a Ziploc bag with batter and squeeze out onto cookie sheet. Bake for 40 minutes.

Here I am attempting to make them look fancy


5. Enjoy!!


Tuesday, October 22, 2013

give me a quiche

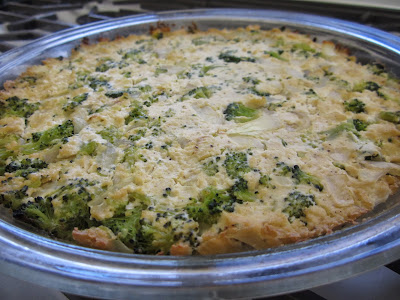
In my foods class, we're learning about alternatives to the most common protein sources, and our most recent recipe was a tofu quiche. Since there are half days this week in school (yay for parent-teacher conferences), having this class 4th period is especially convenient as my stomach grumbles by 11:30 and I can't stand the thought of having to wait another hour to eat lunch.

Half days are wonderful because I always think to myself that with the extra two hours I can accomplish so much more, and even though I never seem to end up following through with that, I seem to find the time to do more of what I would want to do on a normal day (like blog and make myself good food). But today I didn't need to do that, because I had this quiche before I got home!

I usually don't use tofu in anything I make for myself, but not really for any particular reason. I can't say that I don't like the taste of tofu because it really doesn't have one (it takes on the flavor of whatever it's being cooked with) I guess I just never think to buy it. Tofu has a few benefits though. It's made of soy and is a complete protein (possessing all the essential amino acids). Tofu is also high in calcium. For vegetarians and vegans, this is an excellent source of both protein and calcium (for non-vegetarians and non-vegans also of course!) but it's important not to eat too much tofu or soy product.


Here's what you need:
yields 1 quiche = 4 servings
3 cups broccoli florets
3 tbsp olive oil
1 cup chopped onion
3 cloves garlic, minced
1 lb regular tofu
2 tbsp lemon juice
1 tsp dry mustard
1 tsp sea salt
1/4 tsp ground pepper
pinch turmeric

1. Preheat oven to 350 degrees. Blanch (boil in 1 inch of water for 5 minutes) small broccoli florets, then drain.


2. Saute onion and garlic in oil.


3. Blend together lemon juice, dry mustard, sea salt, pepper, turmeric, and 1/2 lb of tofu in food processor or blender until smooth and creamy (texture of hummus).


4. In a large bowl, fold in 1/2 lb tofu (crumbled), onions and garlic, and broccoli.


5. Oil and pie pan and press mixture into it. Bake for 30 minutes.


6. Enjoy!!


Thursday, October 17, 2013

scream and sprout

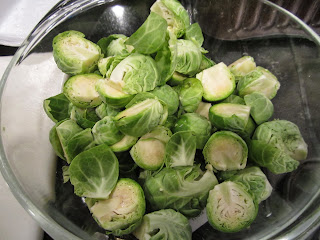
Brussel sprouts have a reputation that they're disgusting and the least common favorite vegetable. Most people assume they won't like brussel sprouts and refuse to try them. But in my house, they're a definite favorite. My sister Suzanne found this recipe and made it in her apartment at school and the pictures she sent me of how the side dish turned out made me want to make it at home, it looked delicious! These balsamic roasted brussel sprouts are a perfect side dish and definitely a perfect recipe to try if you're on the fence about brussel sprouts. There are a lot of flavors in here and hopefully at least one of them can grab your attention to try it.

Brussel sprouts contain antioxidants, calcium, phosphorus, potassium, vitamin C (essential for your immune system), vitamin B3 (vital for healthof your digestive system), vitamin B5 (needed for energy production and skin/hair health), and vitamin K (a fat-soluble vitamin needed for proper blood clotting and bone density maintenance).


Here's what you need:
yields 4 servings 
1 pound brussel sprouts, sliced
2 tbsp olive oil
3 tbsp balsamic vinegar
2 cloves garlic
1 tbsp honey
3 tbsp chopped walnuts
2 tbsp dried cranberries
1 tbsp goat cheese
salt and pepper to taste

1. Wash and slice brussel sprouts.


 2. Combine olive oil, balsamic vinegar, honey, salt and pepper in a small bowl. Grate garlic into bowl using a microplane.


3. Pour over burssel sprouts and heat for 10-15 minutes on medium (I used a grill pan).


4. Removed from heat. Add walnuts, cranberries, and goat cheese.

5. Enjoy!!


Friday, October 11, 2013

falling for this

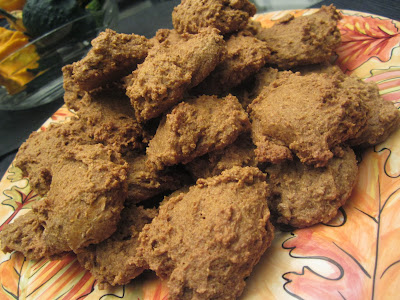
A few weeks ago, one of my friends was over my house and we decided to bake pumpkin cookies. I found a recipe off Pinterest, so we tried it out. I didn't check to make sure I had all of the ingredients though, and it turned out that we didn't have ground cloves in my house. All I could find was a container of whole cloves, so the two of us took a meat tenderizer and started grinding our own cloves. It was really amusing, but the cloves didn't get as small as they should have, and we found quite a few big pieces in our cookies. When my mom got home, she went into the cabinet and found that we had ground cloves the whole time..

The cookies were great regardless though, and I decided to make them again tonight. My sisters are currently on a flight home for the weekend so it'll be nice for them to come home to cookies, plus I cannot get enough pumpkin anything these days. Pumpkin puree contains a lot of vitamin A, which supports cell reproduction, vision health, immune function, and bone health. It also has a lot of vitamin K, which helps with blood coagulation and potential protects against osteoporosis. There is a high antioxidant content, offering lutein and zeaxanthin, both of which support vision health.


Here's what you need:
yields 50 cookies
 2 1/2 cups whole wheat flour
1 tsp baking powder
1 tsp baking soda
2 tsp cinnamon
3/4 tsp ground nutmeg
3/4 tsp ground cloves
1/2 tsp salt
1/2 cup unsweetened applesauce
1 1/2 cups sugar
1 cup canned pumpkin puree
1 egg
1 tsp vanilla extract

1. Preheat the oven to 350 degrees. In a medium bowl, combine dry ingredients (flour, baking powder, baking soda, cinnamon, nutmeg, ground cloves, and salt).


2. In another medium bowl, mix together applesauce and sugar. Add pumpkin, egg and vanilla; beat until creamy.


3. Mix in dry ingredients and stir until combined. Drop dough onto a parchment paper-covered cookie sheet. Bake for 30 minutes.


4. Enjoy!!


References: http://www.livestrong.com/article/469900-what-are-the-health-benefits-of-eating-pumpkin-puree/

Wednesday, October 9, 2013

this recipe is pretty a-peeling

It's that time of year that apples are in season! It's one of my favorite fruits, and I could not be more excited for the apple-picking time of year! For now though, I've been eating apples from the supermarket, and last night I decided to make apple chips for myself. I had to stay after school for a few hours for one of my clubs today, and I knew I'd get hungry. These apple chips were the perfect snack to nibble on while working and they're packed with nutrients! Relatively low in calories, apples contain carbohydrates that help metabolize fats, allow the nervous system to function and help muscle tissue hold onto its protein stores. An apple also has a lot of fiber and vitamin C. Your body can't make vitamin C on its own, so it's important to consume it regularly in a diet. Although my apple chips were made of peeled apples, the skin has a lot of polyphenols (a type of antioxidant) that help regulate skin cell growth and reduce risk of cardiovascular disease.

Here's what you'll need:
2 Fuji apples
cinnamon, nutmeg, brown sugar

1. Preheat oven to 350 degrees. Using an apple peeler/slicer or a knife, core and slice apple thinly (the thinner the slices, the crispier the chips).


The apple peeler I use takes the skin off, so I ate it separately!

2. Lay apple slices on a baking sheet. Sprinkle with desired amount of spices. 


3. Bake for 1 hour. Enjoy!!


Resources: http://www.livestrong.com/article/287864-what-is-the-nutritional-value-of-an-apple/

Thursday, October 3, 2013

it was Greek to me!

Every day for lunch I pack a Greek yogurt and either flax seed or Chia seed to put into it (unless I bring leftovers from the previous night's dinner). I've had the same lunch for years, but I've never looked into why Greek yogurt is so much healthier than regular yogurt. I sort of just took it for granted since it became well-known. So I looked further into why Greek yogurt has been so demanding and what about it is so healthy.

Yogurt comes from milk that has had healthy bacteria added, causing fermentation. During this process, the yogurt thickens. It is then strained through a cheesecloth, which allows liquid whey to drain off. Regular yogurt is strained twice, and Greek yogurt is strained three times (which is why it's thicker).

In comparison to regular yogurt, Greek yogurt has almost double the protein, fewer carbohydrates, and half the soldium. The calories (of plain yogurts) are comparable and there is more calcium in regular yogurt, and from my research it seems like there's a bit of a debate which one is "better"; in my opinion the benefits of Greek yogurt outweight those of regular yogurt.

The protein content keeps you full, Greek yogurt is easy to digest (due to the lower amount of carbohydrates and therefore lower amount of lactose), and it contains probiotics. These are microorganisms that help improve digestive function and the immune system, and protect against colon and bladder cancer. Probiotics are considered a "good" bacteria and can ensure absorption of nutrients and a proper development of the immune system, and can protect against microorganisms which cause disease.

Greek yogurt is also very versatile! It can be eaten with fruit and granola (or flax) as a lunch, as a substutite in baking or as sour cream on tacos, mixed with seasoning as a dip for vegetables, or made into a fruit dip, like the one I made for myself after school today.


Here's what you need:
yields 2 servings
1 vanilla Greek yogurt
1 tbsp honey
2 tbsp ground walnuts
1/2 tbsp cinnamon 

1. Mix all ingredients in a bowl (or in the yogurt container!)


 2. Enjoy with your favorite fruit! I had it with apples and strawberries and it was delicious!!


Resources: http://health.usnews.com/health-news/diet-fitness/diet/articles/2011/09/30/greek-yogurt-vs-regular-yogurt-which-is-more-healthful?page=2

 http://www.livestrong.com/article/257915-probiotics-greek-yogurt/

 http://www.livestrong.com/article/86488-benefits-greek-yogurt/ 
 
http://www.fitday.com/fitness-articles/fitness/yogurt-smackdown-greek-vs-regular.html


Wednesday, October 2, 2013

lettuce enjoy

My kitchen group in foods class must think I'm crazy by now. At every step of the recipe I stop them to take a picture, and when the recipe is done and all they want to do is try the food, I take pictures of it at every possible angle. Sorry guys! 

These quinoa lettuce wraps are too good not to blog! In class everyone loved them, and they're loaded with health benefits. The quinoa is protein-packed, filling, and rich in fiber. It acts as an internal cleanser and detoxifier, it's high in calcium and iron (which helps deliver oxygen to the blood and brain), and has a high vitamin B content (which helps keep your mind sharp, stabilizes moods, and helps with alertness). The sesame oil is antibacterial, antioxidant-rich, and helps reduce high blood pressure. The ginger is good for gastrointestinal relief (it helps when you have a stomach ache) and is high in vitamin C. Garlic acts as a "natural aspirin" and acts as medication against the common cold. The active ingredient is Allicin, which relieves congestion. (*Tip: If you let minced garlic sit out for a little bit, the Allicin will intensify. One spoon of the garlic and honey every day will help "cure" your cold). The apple cider vinegar can help relieve nausea and can help lower cholsterol and blood pressure, and the parsley is packed with antioxidants, vitamin K, and is a natural breath freshener.


Here's what you need:
yields 8 lettuce wraps
 2 cups cooked quinoa
1 tbsp red onion 
2 carrots
1/4 cup soy sauce
1 tbsp sesame oil
1 garlic clove
1 tsp ginger
1 tbsp apple cider vinegar
t tbsp honey

1. Peel and grate carrots into small shreds. (You can also julienne the carrots). Chop onion into small pieces. Mince garlic.


2. Mix sesame oil, soy sauce, garlic, ginger, vinegar, and honey in a small bowl.


3. Mix quinoa, onions, and carrots in a large bowl.


5. Pour contents of the small bowl (the "dressing") into the quinoa bowl and mix.


6. Wash and dry lettuce leaves.


7. Fill lettuce with quinoa mixture. Enjoy!!