Search This Blog

Sunday, November 25, 2012

last post was cheesy, this one' s corny

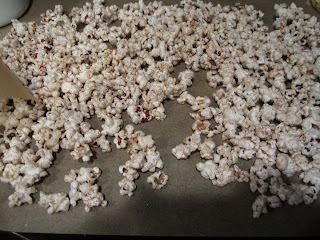
I used to make myself popcorn with different spices every weekend and portion off a baggie a day to bring to school. I stopped doing it a while ago, but last month at my after-school job, my friend Tiffany who I work with reminded me of my popcorn-making days and asked me to make her some for work next week. And tomorrow I have work, so I decided I'd make us some popcorn to munch on.

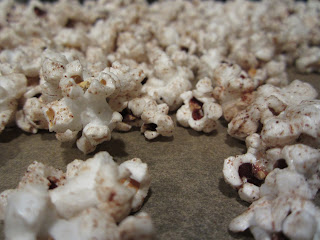
What I used to do was air-pop popcorn, then spray PAM and then sprinkle spices onto the popcorn. It's a good snack when I wanted something to pick at, I got to choose which spices I wanted, and air popped popcorn is so much better nutritiously than microwave. I had seen online though to use coconut oil to get the spices to stick, so that's what I tried today. It's the same idea, but with the added super-food coconut oil.

Coconut oil is good for so many things! It benefits in hair care, skin care, stress relief, maintaining cholesterol levels, weight loss, increased immunity, proper digestion and metabolism, relief from kidney problems, heart diseases, high blood pressure, diabetes, HIV and cancer, dental care, and bone strength. Coconut oil also helps in brain function and is associated with Alzheimer's treatment. (What doesn't it help with?!)

The spices also add to this great snack. This is a new combination for me, I usually don't use ginger, but I really like how it tastes, and each spice has health benefits as well.


Here's what you'll need:
1/4 cup un-popped popcorn kernels
2 1/2 tbsp coconut oil
1/2 tsp cinnamon
1/4 tsp ground ginger
1/4 tsp nutmeg

1. Pop the popcorn kernels with an air-popper.


2. Prepare your spice mix!

3. Heat the oil in a small pan on a low setting until the solid oil has turned to a liquid. (It's hard to see in the picture, sorry!)


4. You may need a second set of hands for this part. While pouring in the oil slowly with one hand, sprinkle on the spice mix with the other. Then stop and mix it all around and repeat until you've used up all the spices. (I had a little of oil left over because I didn't want the popcorn to be too oily).


5. My popcorn still came out a little oily, so I spread it out on parchment paper (you could also use paper towels) so the oil could be absorbed a little bit more before I put the popcorn in baggies for tomorrow.


6. Enjoy!!!

Reference: http://www.organicfacts.net/organic-oils/organic-coconut-oil/health-benefits-of-coconut-oil.html

Friday, November 23, 2012

this post is a bit cheesy

I hope everyone had a great Thanksgiving yesterday and still feels stuffed today. Because although portions and healthy choices are important, so is not having to worry about how many portions you have of the amazing sweet potatoes or cranberry sauce. Of course I hope no one overstuffed themselves to the point of eating a month's worth of food, but but I'll hope you've worked it all off already with Black Friday shopping. (It's past 10 AM, the best sales are long over).

So I'll admit that I broke some healthy eating rules yesterday, but it's ok to do that sometimes. I also baked something that is not on the top of the "healthy desserts" list, but it is by far my favorite thing to bake and then eat afterwards....Cheesecake!

I use a recipe I found a few years ago on allrecipes.com and I really didn't change it at all, but here's my finished project!

*I apologize that I don't have a picture of the full cheesecake without the siding of the spring-form on it, I remembered today that after transporting the cake to my aunt's house yesterday with the siding still on, I needed a picture with it off. So instead I have a picture of the leftovers that we got to take home.


Here's what you'll need:
1 1/2 cups graham cracker crumbs (1 package within the box)
3 tablespoons sugar (for the crust)
1/3 cup butter, melted
4 8oz packages of cream cheese, softened
1 cup sugar (for the cake)
1 teaspoon vanilla
4 eggs
9in springform pan

1. Preheat the oven to 325 degrees. Mix crumbs, 3 tbsp sugar and butter (I usually end up using a little less than the amount of butter called for). Press firmly onto the bottom of the pan. I put this in the oven to bake on its own for as long as it takes me to make the filling (just keep checking on it in case it takes you a really long time baking.)


2. Beat cream cheese, 1 cup sugar, and vanilla in a mixing bowl with an electric mixer (I start off on the lowest speed and only go to medium at the end). Add eggs, one at a time. Pour over crust.


3. Bake for 1 hour at first, but it may need more time. Bake until the center is mostly set. Enjoy!!


*Store cheesecake in the refrigerator (if there are any leftovers!!)

Monday, November 19, 2012

it's worth a fry

I'm pretty sure I could eat sweet potatoes every day of my life, and as far as favorite foods go it's a little unusual, but I love them. And how my mom and I make them with dinner, you'd never know the different between a sweet potato fry from Friday's and our homemade sweet potato slices (ok maybe you would - but these are so good I promise).

Sweet potatoes always find themselves on "the best foods to eat" lists, and they really are a super-food.   Compared to your average potato, sweet-potatoes pack in many more nutrients and are a healthier alternative. Loaded with vitamin A, vitamin C, fiber, calcium, and potassium, sweet potatoes are a no-brainer food to eat, and I personally think they taste delish.

*Fact: Yams and sweet potatoes are often used interchangeably, but sweet potatoes are actually nutritionally superior. They have greater protein and fiber contents, and the biggest difference is that sweet potatoes have a huge vitamin A content, whereas yams don't.


Here's what you'll need:
4 sweet potatoes (serves about 4 people - 1 potato a person)
olive oil
spices (I used paprika, cayenne, chili powder, salt)
*Tip: Dr. Weil was recently on Dr. Oz's show and recommended using iodized salt when cooking. Iodine is necessary for the thyroid gland, and in recent years the average intake of iodine has decreased nationally. This is because people are cooking less and taking-in food more; so when we do cook, we should use iodized salt so we are sure to get the iodine we need.

1. Preheat oven to 350 degrees.

2. Peel and cut up the sweet potatoes in thin strips (thinner strips cook faster and get crispier quicker!)


3. Put all the strips in a big bowl, and sprinkle with olive oil.


4. Add spices to your liking and mix fries around to spread out the spices.


5. Lay on a tray and put in the oven for a least 1 hour. The longer you leave them in, the crispier they will get (but don't let them burn!!).


6. Enjoy!!!


references: http://www.webmd.com/food-recipes/features/10-everyday-super-foods?page=2
http://www.livestrong.com/article/257046-sweet-potato-vs-yam-nutrition/
http://www.drweil.com/drw/u/QAA400874/Why-Buy-Iodized-Salt.html

Wednesday, November 14, 2012

how about them apples?


I found originally this apple crisp recipe on Pinterest (which I totally recommend everyone should try) and I liked the idea of it because both my mom and my best friend are allergic to uncooked apples, and I thought this was a good way for them to enjoy an apple without having to prep too much.

It’s great because it could be a breakfast on the go if need be, or it could be a great dessert. The oats add a nice texture and fiber to keep you full, the cinnamon is good for lowing LDL cholesterol and enervating headaches, and an apple a day keeps the doctor away doesn’t it?

I’ve made this twice so far and changed up the recipe a bit from where I found it. I've also tried it with a pear and it works just as well! I hope you like my changes to the recipe!
  

Here’s what you’ll need:
1 relatively small apple
1 tsp whole wheat flour
¼ - ½ tsp cinnamon
1 tbsp old-fashioned oats
3-4 tsp sugar*

*The thing with this is I ran out of brown sugar the second time I made this, so I was able to experiment a bit. What I found was that it there are a myriad (SAT word of the day) number of combinations of sugar that work. The first time, I used 3 tsp brown sugar granules and 1 tsp regular sugar. The second time I used 2 tsp brown sugar and 2 tsp sugar. Next time I think I’ll try using packed brown sugar and brown sugar granules as a combination. Whatever your combination, I would aim for 3-4 tsp of sugar in total.


1. First, mix together the sugar, flour, and cinnamon on a plate and cut up the apple into thin slices.


 2. Then coat the apple slices in the dry ingredients you just mixed.


3. Put the coated apples in a microwave safe mug, then add the oats and a bit more cinnamon (which is optional – I personally like more cinnamon). Then shake the mug a bit to let the oats seep down through the mug. 


4. Put it in the microwave for 1 minute, stirred everything around with a fork, then put it back in for 30 seconds. Then enjoy!


Saturday, November 10, 2012

it's a ball of energy

Yesterday officially was the shortest school week I've ever had, but I'm honestly very happy to be back at school. I like routine and I like having things to do, so after a while the unexpected break was getting boring for me. I also felt my brain turning to mush after 13 days of not doing classwork or homework, and I'm glad to be back in my classes.

But everyday during third period history, I start to get hungry as my teacher goes off on tangents about his life and how it's sort of relevant to US history. A lot of students in my class seem to munch on something during this period; the girl in front of me has a 100 calorie pack of cookies or Cheese-Its, the girl next to me has a new kind of granola bar all the time. But I try to stay away from processed food, so I whip out my ball of energy.

I originally found the recipe here  but I changed it around a bit to how I like it. It's an easy no-bake recipe made with natural peanut butter (less sugar than your average PB) and oats; one ball holds me over until lunchtime, and it just tastes so good!!

The flax seed is also a great ingredient in these balls of energy, and like chia seeds, ground flax seed contains Omega-3's (the good fats), antioxidants, and fiber. It helps prevent cancer, cardiovascular diseases, and certain types of diabetes too. Plus, it's basically tasteless and blends right into the other ingredients in these no-bakes.

Another great thing about this is that there are so many substitutions possible with this recipe. The original blog I found this on suggested coconut flakes, and you could substitute the chocolate chips for dried fruit, nuts, or just more of the oats or peanut butter. But I personally think the chocolate is necessary!


Here's what you'll need:
1 cup old fashion oats
1/2 cup natural peanut butter (I use Skippy)
1/2 cup flax seed
1/3 cup chocolate chips
1/4 cup honey (I use a little less)
1 tsp vanilla

1. Toast the oats for 3 minutes (so that they're crunchier).


2. Add all other ingredients into a mixing bowl, and then add the oats once they're toasted. Mix together so that all the ingredients form a big clumped ball together.


*Tip: Did you know that the top of a vanilla bottle is 1 tsp? Saves you a measuring spoon!


3. Refrigerate for 15 minutes, then roll into balls of your preferred size. I usually aim for a 1 inch diameter per ball. That should yield 14 balls.


4. From here, keep refrigerated for up to a week, or what I do is wrap them individually in wax paper and freeze them. Then, every morning when I pack my lunch for school I'll take one out. By third period it's defrosted and ready to be eaten! Enjoy!


reference: http://www.webmd.com/diet/features/benefits-of-flaxseed?page=3

Thursday, November 8, 2012

a rice dinner in the dark

Yesterday (day 13 of no school) all I wanted to do was make quinoa "fried rice", but when my mom and I got home from our errands it was to close to the time we were going to the gym to make it for lunch, so I ate a yogurt and settled on making the quinoa with dinner.

....And then on the way home from the gym, it felt like the middle of December with the snow blizzard going on around us, and all the street lights were off again. No power. So we got home and I was hungry and so determined to make this quinoa, and the darkness did not stop us.

This is a great side dish with dinner, or a lunch on its own. Quinoa is a really great source of protein, and it has iron and calcium too. Plus half of this is just vegetables so it couldn't get better! Also, the curry is great for cancer prevention.


*I apologize for the strange lighting of the pictures, but don't be fooled by the quality of my flash - I promise I didn't have power when I made this dinner.  There are also a few things I would do differently with this next time, so I'll let you know when it comes up. (My mom and I didn't use a recipe for this one, we couldn't use a computer to find one, so we winged it.)

Here's what you'll need:
a 10 oz package of frozen vegetables
1 carrot
1 red pepper
eggs
1/2 tsp of curry
1/2 tsp ground ginger
1 1/2 cups quinoa
1 1/2 cups water
sesame oil
olive oil
soy sauce

1. Pour the quinoa and water into a pot and bring to a boil. Stir the quinoa initially, then put a lid on the pan and let it simmer on a medium heat for 10-20 minutes. Check for the right texture.


2. Scramble the eggs!


3. Chop up the eggs when they've cooled. 


 4. Cut up the pepper and carrot. Drizzle a little olive oil on the bottom of a pan, and add the vegetables.  Stir it around, then add the mixed vegetables. (I added edamame also, but thanks to the darkness I didn't know the beans were still in the pods.. I would leave out the edamame next time though).


 5. Once defrosted, drizzle the vegetables with sesame oil and soy sauce (We added about a tbsp each, but next time I would use less soy sauce). Then add the ginger and curry to the mix.
 6. Once the vegetables are done, mix the quinoa, eggs, and vegetables all together!! Enjoy!


Reference: http://www.livestrong.com/article/4695-need-health-benefits-quinoa/